My RV Waste Valve is Stuck Closed, Why, and How to Fix It?
Nothing can be quite as frustrating to a recreational vehicle owner as a stuck waste valve. If this valve is stuck or hard to open it not only makes dumping the vehicle’s tanks an intensive process, but it almost always signifies that repairs to the waste valve will need to be made in the near future.
While it is rare, your RV’s waste valve could be stuck because it is not seated correctly. If so, you are in luck, and you should be able to fix the problem with little effort and supplies. The proper processes for loosening a recreational vehicle’s stuck waste valve and for replacing a recreational vehicle’s waste valve are explored below.
In addition, common treatments and preventive maintenance procedures that can prevent a stuck valve from occurring in the future are also mentioned. Therefore, if you are currently having problems with your RV’s waste valve, or you are simply looking to prevent such problems from occurring, you should continue reading through the various sections below!
How To Loosen a Stuck Waste Valve on Your RV
In general, when the waste valve on your RV begins to stick you should take this as a good indicator that you should replace the gate valve in the near future. You do not want to wait for the waste valve to break fully as this could land you in a messy situation. However, if you are in the middle of a road trip or simply need to open the valve to dump your tanks, you can attempt to loosen the waste valve using various methods.
The most common method to loosen a stuck waste valve involves taping the outer portion of the valve, around the circumference of where it is seated, with a hammer. You may be frustrated with the valve at this point, but you will want to keep your taps at moderate strength.
Once again, you do not want to break the waste valve as this can lead to your rv waste tank spilling all over the place. This will cause you to have to make repairs immediately and be quite the mess of sewer waste or grey tank mess.
If tapping the valve with a hammer does not work, there are several other at home tricks you may be able to implement to try and get the valve open. While it may sound strange, dumping a container of dish soap or RV drain valve lubricant into your black water tank and then driving the RV around may help loosen the stuck valve. Before you go to drive your RV around, you can also add a bag of ice to your vehicle’s black water tank to hopefully help distribute the dish soap or lubricant further.
This method may seem unorthodox, but as you drive your vehicle around the dish soap should be pushed all over the black water tank by the ice cubes. If the soap manages to reach the waste valve it could loosen the valve enough for it to open. If you can’t get your rv’s waste valve open, you will need to replace it.
Adding lubricant to your waste valve as well as flange seals could also help open your stuck sewer valve. Whether it is your black tank valve or your grey tank waste valve, this should be the same process. Lubricate the rubber seals, as well as the plunger on your gate valve. This may require letting it sit after you do so to let the lubricate penetrate in.
Always make sure your sewer hose is hooked up to a dump station when doing this as this could lead to RV black tank contents all over the ground if it suddenly flies open.
How to open a stuck RV Electric Waste Water Gate Valve
If your electric valve is not working, this could be a power issue, mechanical, or just stuck like a normal gate valve.
To troubleshoot, start by checking for power. If you have power, have someone hit the switch while you are listening to the valve, do you hear a solenoid clicking or gears grinding? If so, this may mean there is internal damage and you need to repair or replace the valve. If not, try lubricating the valve seals as well as any mechanical areas and try to open the stuck valve again.
How to open a stuck low point drain?
If your low point drain is stuck, try the same process as above, use lubrication on the mechanical items and seals and see if you can work it open.
How To Remove the Waste Valve on Your RV
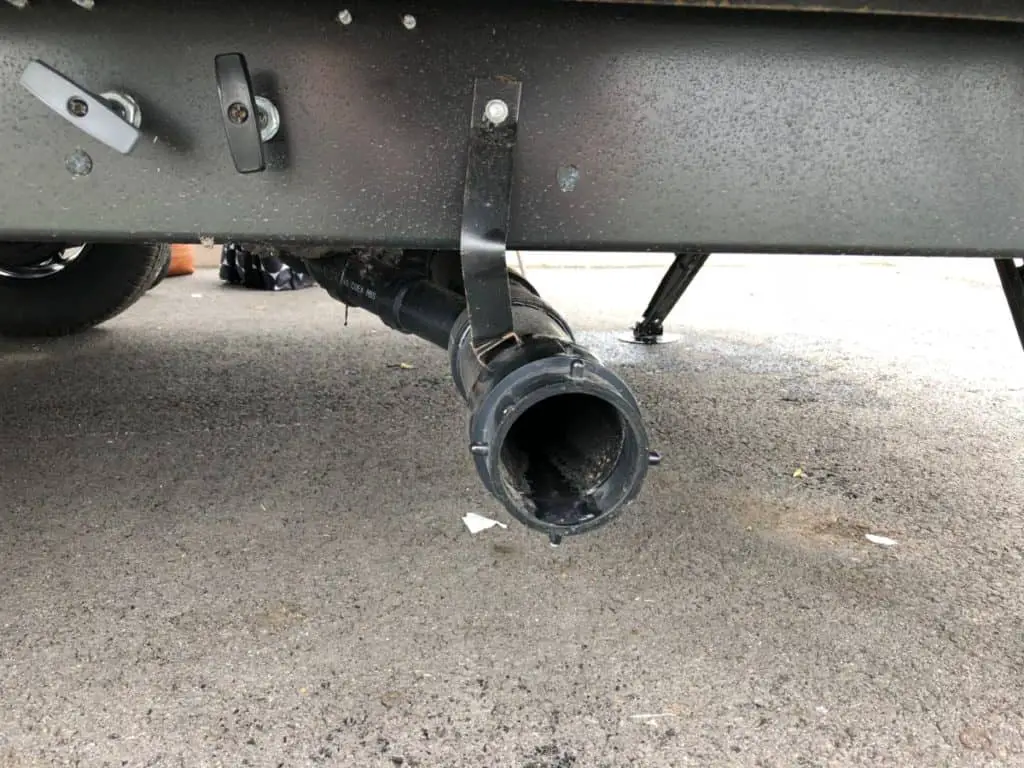
The first step in replacing the waste valve on your RV is to remove the old waste valve from the RV. To complete this step in the repair, you will need to first locate the four bolts that hold the valve tight to the black water tank or the piping on the grey water tank. Once these bolts are located you will then need to remove them using one wrench to hold the bolts and another to loosen the nuts. If you can open your waste valve, you should always empty your black water tank before making this repair. If you can not open your waste valve, the process might get messy and more disgusting if your tank is full.
Keep in mind toilet items will be still in these pipes so always wear gloves and any other protective clothing when removing a holding tank drain valve.
Once you have loosened the four bolts holding the waste valve to your RV, you will then need to locate the two flanges that are placing pressure on the valve. Once located, use your fingers to pry open these two flanges. However, be careful not to damage the flanges as this will only increase the cost and extent of your repairs. After you have removed the four bolts and have the flanges pried back, you should be able to remove the valve. Next, you will need to install the new valve.
HOW TO REMOVE AN OLD WASTE VALVE ON AN RV
Step 1: Locate the four bolts holding the valve in position
Step 2: Loosen these four bolts using a wrench to hold the bolts and another to turn the nuts
Step 3: Pry back the flanges and carefully remove the valve
How To Install a New Waste Valve on Your RV
When purchasing a new waste valve, make sure you buy a quality component so it does not happen again. The first step to installing a new waste valve on your RV is to clean and lubricate the flanges on the RV waste system. These flanges need to be lubricated to ensure they will continue to function properly. Failure to properly lubricate these flanges could lead to another stuck valve in the future.
After cleaning the drain valve flanges, installing a new waste valve on your RV is pretty much like removing the old waste valve, except the steps are repeated in reverse order. Therefore, you should first locate your new valve and then pry back the two flanges to properly place the valve in its correct location. Once the valve is seated properly, you can then begin to tighten down the four bolts that hold it in place. This step should be completed just as before when you removed the broken valve. However, this time one wrench should be holding the nuts on the end of the bolts and the other wrench is tightening the bolts. After you have the bolts tightened, you should attempt to open and close the waste valve a few times to make sure it is functioning properly.
HOW TO INSTALL A NEW WASTE VALVE ON AN RV
Step 1: Clean and lubricate the rv’s waste system flanges
Step 2: Pry back the flanges and position the new valve
Step 3: Tighten down the four bolts
Tips to Avoid a Stuck Waste Valve in the Future
The best maintenance is always preventive, and there are several different procedures and tricks one can implement in their RV maintenance regiment to prevent the vehicle’s waste valve from sticking in the future.
The most common method for preventing the waste valve from sticking is to lubricate the seals or grease the valve every other month. In the winter, you should also make sure that you clean your RV’s tanks thoroughly before winterizing the vehicle. If any waste or water is left in the tank through the winter it can freeze and solidify around the waste valve seal. If this does happen, loosening the waste valve will be very intensive and frustrating.
Stuck Waste Valves
A broken or stuck waste valve stinks, and that’s not even taking into account the smell of the RV toilet waste it is holding back. Of course, every recreational vehicle owner will try their best to prevent their RV’s waste valve from becoming stuck.
However, these things just happen sometimes. Once you notice your waste valve is stuck you can attempt to loosen it with a hammer or dish shop as prescribed above. Though if the valve is stuck well enough, you might need to break down and replace it.
As you previously read, replacing the waste valve on your RV is not a challenging process, but it can take several minutes or hours if they are enclosed valves. If you are replacing the valve at a dump station with your sewer hose connected, make sure the station is not busy to be courteous to other RV owners. Good luck!
Be the first to be notified about FREE tips, hints, coupon codes, and email-exclusive information. All for FREE!